

New Estate Pro – Support help
Introduction
A fully featured WordPress theme for real estate business. It is completely provides all the needs of real estate owners and agents. Capable of handling properties, agents, agencies easily makes it as unique. Bonus feature: Your user can add thier properties to your site and you can earn for that.
How do I install New Estate Pro theme?
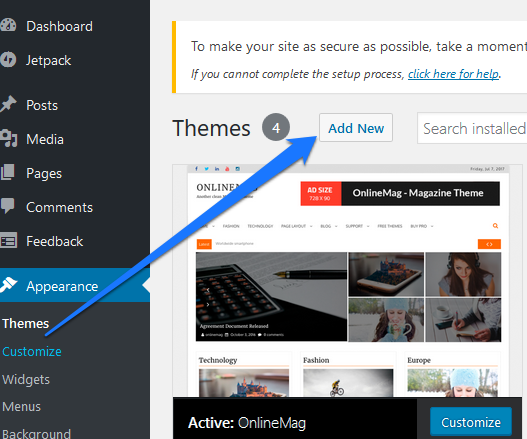
- Log in to the WordPress Administration Panels.
- Go to Appearance > Themes.
- Select ‘Add New’.
- Then select ‘Upload Theme’.
- Click ‘Browse’ and Locate ‘newestatepro.zip’ Theme in your computer.
- Select ‘newestatepro.zip’ and click ‘Install Now’.
- Activate now.
If you prefer to install via FTP, follow these steps.
- Unzip newestatepro.zip to your Desktop.
- Using an FTP client to access your host web server, go to wp-content > themes and upload your new copy of your newestatepro theme.
- Now, log into the WordPress Dashboard with your login details.
- Select the Appearance panel, then Themes.
- You will see the theme in the list.
- Then click Activate button.
Now you will be asked to install required plugins. Please install all those plugins and activate by clicking ‘Begin installing plugins’ link. You are ready to go to next part now.

Install demo content
Download the below content first and follow these steps to make your site like our demo page.
Demo Content
How do I install demo content?
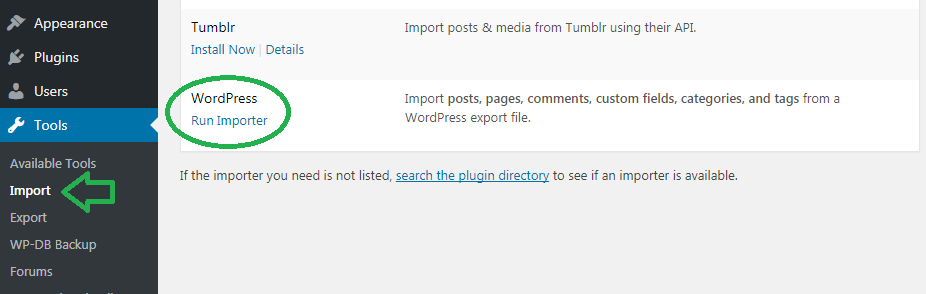
- Go to Tools → Import in the blog’s Administration Screen.
- Click “Install Now” link under the “WordPress”
- Click “Run Importer” link.
- Upload the above downloaded demo content file using the form provided on that page
- You will first be asked to map the authors in this export file to users on the blog. For each author, you may choose to map to an existing user on the blog or to create a new user.
- WordPress will then import each of the posts, comments, and categories contained in the uploaded file into your blog. In addition, you can import attachment by checking the “Download and import file attachments” option.
- You are almost installed the demo contents
Setting custom homepage
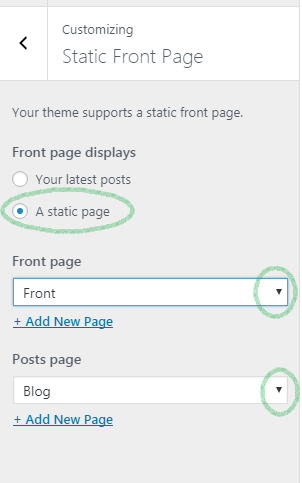
- go to Customize > Static Front Page > A static page
- select the “A Static Page” option which is under the heading “Front Page Displays”.
- select ‘front’ from the dropdown under ‘Front page’ option.
- select ‘Blog’ from the dropdown under ‘post page’ option
- Save
- PS: ‘Front’ and ‘Blog’ options will appear only when you have installed our demo content. Else you can Create a new page by going to Pages > Add New in the WordPress Dashboard. Then you can choose those here.
Before we dig into customize homepage, we need to set few basic things.
Currency SettingsGeneral SettingsMeasurement
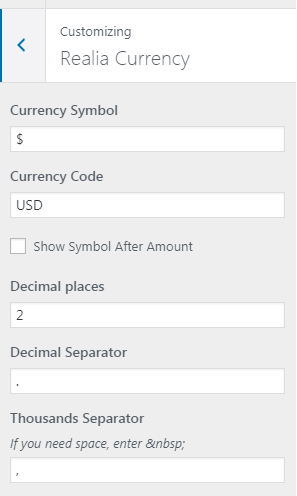
go to Customize > Realia Currency > Fill your currency preferences
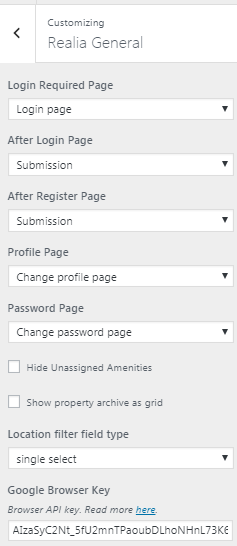
go to Customize > Realia General > choose the appropriate options. These settings are useful if you let your users to create properties by their own. If you are the only person who add properties to your site then these settings are not necessary. Anyway don’t forget to fill the Google browser key, it is must if you prefer to show google map.
go to Customize > Realia measurement > Give your preferred measurement unit. It will applied in all your properties as default units.
Setting site like our demo
Logo SettingsTop BarHomepage settings
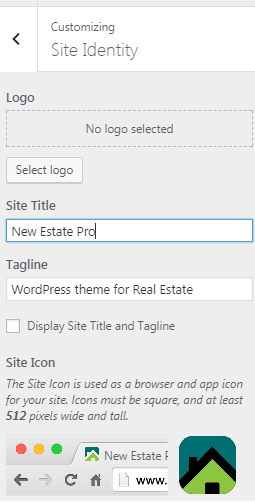
Go to > Appearance > Customize > Site Identify.
- Logo: Choose your website logo image if you have
- Site title: Obviously your website or business name. This will displayed on google search too
- Tagline: Description of your site.
- Un tick the ‘Display Site Title and Tagline’ if you wish to show image logo.
- Site icon also known as fevicon which will be shown on browsers tab.
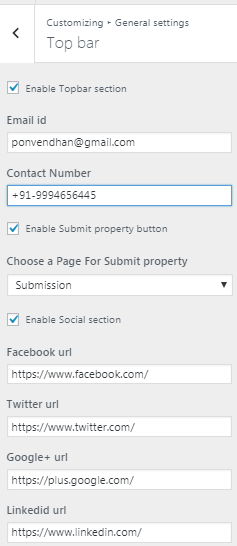
Go to Appearance > Customize > General Settings > Top Bar
- Tick Enable topbar section
- Edit the email id and phone number with your’s. Left blank if you don’t want to show
- Tagline: Description of your site.
- Un tick the ‘Display Site Title and Tagline’ if you wish to show image logo.
- Tick Enable submit property button. You or your users can add properties from front end (directly from your website)
- Provide social website links if you want.
Before dive into the Homepage settings, make sure you have already set a static front page. Refer ‘Setting Custom Homepage’ above.
You can edit all home page options from Appearance > Customize > Homepage settings
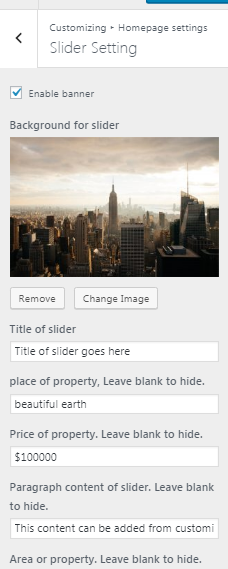
Slider
Tick Enable banner, edit all the placeholder content with your’s.
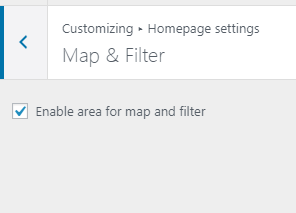
Map & Filter
Go to Appearance > Customize > Homepage settings > Map & Filters
- Check Enable area for Map & Filters
- Then go to Appearance > Customize > Widgets > Homepage Widgets
- Only two widgets will work well here. Those are ‘Properties Map’ & ‘Filter’
- If you wish to add Properties map widget here, then make sure you have added google browser api key [ Appearance > Customize > Realia general ]
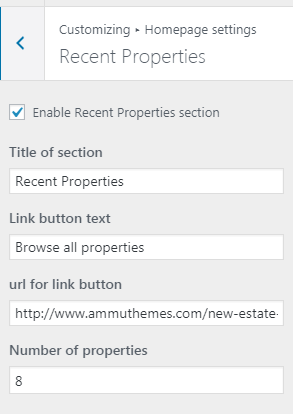
Recent Properties
Go to Appearance > Customize > Homepage settings > Recent Properties
- Tick Enable Recent Properties Section
- Add Title and Link text as you wish.
- add url as you wish. I prefer ‘www.yourwebsite.com/properties/’
- Set number of properties to show. Multiply of 4 would give good alignment.
Recent Agents
Go to Appearance > Customize > Homepage settings > Our Agents
- Recent agents will be listed here
- Tick Enable agents section
- Set number of agents to show on homepage
Latest posts
Go to Appearance > Customize > Homepage settings > Latest posts
- Recent posts will be listed here
- Tick Enable Latest posts section
- Set title and and url text.
- Log in to the WordPress Administration Panels.
- Go to Appearance > Themes.
- Select ‘Add New’.
- Then select ‘Upload Theme’.
- Click ‘Browse’ and Locate ‘newestatepro.zip’ Theme in your computer.
- Select ‘newestatepro.zip’ and click ‘Install Now’.
- Activate now.
- Unzip newestatepro.zip to your Desktop.
- Using an FTP client to access your host web server, go to wp-content > themes and upload your new copy of your newestatepro theme.
- Now, log into the WordPress Dashboard with your login details.
- Select the Appearance panel, then Themes.
- You will see the theme in the list.
- Then click Activate button.
- Go to Tools → Import in the blog’s Administration Screen.
- Click “Install Now” link under the “WordPress”
- Click “Run Importer” link.
- Upload the above downloaded demo content file using the form provided on that page
- You will first be asked to map the authors in this export file to users on the blog. For each author, you may choose to map to an existing user on the blog or to create a new user.
- WordPress will then import each of the posts, comments, and categories contained in the uploaded file into your blog. In addition, you can import attachment by checking the “Download and import file attachments” option.
- You are almost installed the demo contents
- go to Customize > Static Front Page > A static page
- select the “A Static Page” option which is under the heading “Front Page Displays”.
- select ‘front’ from the dropdown under ‘Front page’ option.
- select ‘Blog’ from the dropdown under ‘post page’ option
- Save
- PS: ‘Front’ and ‘Blog’ options will appear only when you have installed our demo content. Else you can Create a new page by going to Pages > Add New in the WordPress Dashboard. Then you can choose those here.
go to Customize > Realia Currency > Fill your currency preferences
go to Customize > Realia General > choose the appropriate options. These settings are useful if you let your users to create properties by their own. If you are the only person who add properties to your site then these settings are not necessary. Anyway don’t forget to fill the Google browser key, it is must if you prefer to show google map.
go to Customize > Realia measurement > Give your preferred measurement unit. It will applied in all your properties as default units.
Go to > Appearance > Customize > Site Identify.
- Logo: Choose your website logo image if you have
- Site title: Obviously your website or business name. This will displayed on google search too
- Tagline: Description of your site.
- Un tick the ‘Display Site Title and Tagline’ if you wish to show image logo.
- Site icon also known as fevicon which will be shown on browsers tab.
Go to Appearance > Customize > General Settings > Top Bar
- Tick Enable topbar section
- Edit the email id and phone number with your’s. Left blank if you don’t want to show
- Tagline: Description of your site.
- Un tick the ‘Display Site Title and Tagline’ if you wish to show image logo.
- Tick Enable submit property button. You or your users can add properties from front end (directly from your website)
- Provide social website links if you want.
Before dive into the Homepage settings, make sure you have already set a static front page. Refer ‘Setting Custom Homepage’ above.
You can edit all home page options from Appearance > Customize > Homepage settings
Tick Enable banner, edit all the placeholder content with your’s.
Go to Appearance > Customize > Homepage settings > Map & Filters
- Check Enable area for Map & Filters
- Then go to Appearance > Customize > Widgets > Homepage Widgets
- Only two widgets will work well here. Those are ‘Properties Map’ & ‘Filter’
- If you wish to add Properties map widget here, then make sure you have added google browser api key [ Appearance > Customize > Realia general ]
Go to Appearance > Customize > Homepage settings > Recent Properties
- Tick Enable Recent Properties Section
- Add Title and Link text as you wish.
- add url as you wish. I prefer ‘www.yourwebsite.com/properties/’
- Set number of properties to show. Multiply of 4 would give good alignment.
Go to Appearance > Customize > Homepage settings > Our Agents
- Recent agents will be listed here
- Tick Enable agents section
- Set number of agents to show on homepage
Go to Appearance > Customize > Homepage settings > Latest posts
- Recent posts will be listed here
- Tick Enable Latest posts section
- Set title and and url text.